Our Ultimate Technique for
Chip Budding Roses
By Kitty Belendez
Master Rosarian
Santa Clarita, CA
After 20 years of many miserable failures, Bob and I finally got it right. I'm talking about budding roses (a form of grafting) onto rootstock, which is what we believe to be one of the most difficult methods of propagating roses. But, we finally found a method that works for us at a very high success rate.
Over the years, after hundreds of attempts, we only had about a 15% success rate. This is terrible, and if we worked for a commercial budding company, we would have been fired long ago. But as they say, "If at first you don't succeed, try, try, again." Or, even better "Never give up."
Budding roses is something that we really wanted to learn how to do. We bought videos (the best is by Steve Singer of Wisconsin Roses), attended seminars, read books, and searched the internet for all sorts of how-to's (Ralph Moore, Harold Baker, Malcolm Manners). I hung out in the rose propagating forums, I picked the brains of every rosarian I met at rose conventions and meetings, and we watched demonstrations done by Joe Winchel, Johnny Becnel and Cal Hayes. Remember the clothespin grafting method done by Cecil Godman of Tennessee back in the early '90s? Still not much luck.
We scratched our heads, ever wondering what we were doing wrong. And then we tried again. We bought various rootstocks on which to bud. 'Dr. Huey', Rosa multiflora seedlings, and 'Fortuniana' were the rootstocks we tried. We even tried budding onto climbing-type roses such as the huge and vigorous David Austin Leander shrub rose.
We tried the t-bud cut, cleft grafting, chip budding, and the envelope cut (upside down t-bud). We covered the bud eye with rubber bands, then changed to clear polyethylene grafting tape (non-sticky), then tried raffia and wires. We seemed to be going around in circles. Sure, with a 15% success rate it seemed we were doing okay for a hobbyist budder. But this percentage is horrible when we think about the hundreds of failed attempts we made. Lost time and money, and so disappointing when we were trying to bud a very rare and hard-to-find rose.
At a national rose convention at Palm Springs in November 2009, Bob and I had the good fortune to meet Burling Leong. Burling had worked for the famous rose breeder Ralph Moore for many years and had done much of his budding. I had missed an opportunity to meet Burling at a presentation she had given at the Pacific Rose Society in 2009, and I wanted to ask her if she would speak at Santa Clarita Rose Society as well. A friend mentioned that Burling would have a booth for her new Burlington Nursery at the convention, and that I should try to meet her and ask if she would demonstrate budding for us.
So at Palm Springs, Bob and I visited Burling's booth and we introduced ourselves. We asked her if she would give us some tips on budding roses because our method did not produce good results. Burling not only gave us tips but she immediately demonstrated chip budding for us right then and there. We explained to her how we had been doing our budding, and she graciously told us how to improve our method. Since this was November, I expressed my fears that we might forget what she had told us if we waited until spring to try it. Burling said that with her method we could bud roses any time of year, even winter.
Although we doubted the effectiveness of winter budding, we went home from the convention and immediately budded a dozen roses, then a few more on Thanksgiving weekend, and some more in December, January, and February, for a total of 40 budded roses. We stopped at 40 because this would leave me with only two dozen Fortuniana bud sticks out of the 64 that I had ordered last summer from UC Davis. I wanted to make sure I had some rootstock for spring budding if this winter experiment didn't work.
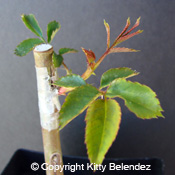
Well, Christmas came and went, and we were amazed that all of the budded roses were still green. The budeyes were still green in January, and on February 7th we budded a few more roses because of a special request from a friend.
As I write this article on April 10th, 36 of these 40 budded roses are still green and viable. That is a whopping 90% success rate! Half of those are already leafing out, and some of the roses we budded as late as January and February are green but not yet leafed out and the bud eyes are swelling on most. This is a good sign. I suspect that we could lose a few more, but the success rate looks like it will be quite high
HERE IS OUR NEW METHOD OF CHIP BUDDING ROSES
After discussing our past technique with Burling, she gave us some suggestions and this is what we did differently to make our budding success rate increase so dramatically!
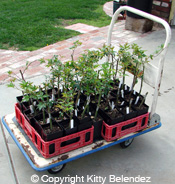
Grow the Rootstock in Larger Pots
First, we moved all of the rootbound Fortuniana rootstock from tiny 2" pots to larger band-type pots. This gave the rootstock more breathing room and helped keep the rootstock from drying out. These bands have large square holes on the bottom of the pots, and you would think that the potting soil would fall out, but it doesn't. We bought the bands from Stuewe & Sons http://www.stuewe.com/ in Tangent, OR. They offer a complete line of nursery containers for tree seedling production. These bands are actually intended for tree seedlings but we found that the rootstock cuttings grow terrifically fast in these bands. The size we bought was 2-7/8" x 5-1/2" which is a good size to fit in your hand while budding, but still deep enough to have plenty of roots. We bought 100 pots at a cost of $15.40 plus shipping. For rootstock that we keep longer than 6 months we also bought a slightly bigger band (3-5/8" x 6"), although the bigger band size is a little harder to work with when budding.
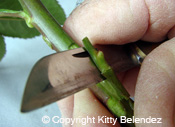
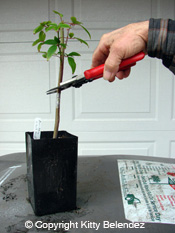
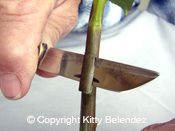
Use a Proper Budding Knife
We purchased a new budding knife. Bob had previously been using a simple box cutting knife, and although it seemed to work okay he really did not have good control over his cuts. We visited the website of a company called Frostproof who is located near Orlando, Florida. They offer a line of agricultural supplies at their website www.frostproof.com. After Googling the internet for more information on budding knives, we selected the very highly rated "Tina" Bench Grafting Knife #H605 (right-handed model) at a cost of $76. We also ordered the Istor Standard Sharpener #HF55 at a cost of $18.50. Shipping was included in the price.
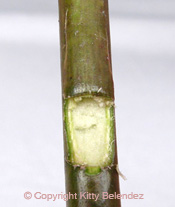
Do Not Remove the Wood Behind the Budeye
In the past, we had tried both removing the wood behind the budeye and alternately leaving it on. Our success rate didn't seem to change with either method. But Burling advised us that we would have better luck if we did not remove the wood. So Bob stopped removing the wood behind the bud eye.
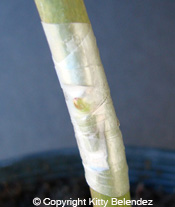
Completely Wrap the Budeye
With our previous budding method, we did not wrap the budding tape completely over the budeye. Instead, we left the budeye just barely poking out and wrapped the tape just barely touching the eye. Now we wrap the budding tape completely over the budeye. We use 1/2" parafilm grafting/budding tape.
Maturity of Budeyes
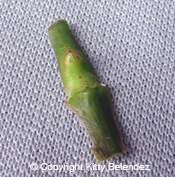
The preferred maturity of the budeyes to be budded is nearly dormant, just beginning to swell.
Chip bud instead of t-bud
Previously Bob had tried various methods of budding and grafting. He had been doing the t-budding most of the time. Now he does chip budding.
When to cut off the tops
Depending on the time of the year, the tops of the rootstock can be cut off as early as 8 weeks from time of budding if the weather is warm and the eyes are beginning to swell. In winter it might be closer to 12 weeks.
Winter Protection
Since we were practicing this experimental budding during the dead of winter when nighttime temperatures were often in the low '30s, we put the bands containing budded roses on a cart and brought them into the garage at night. Then during the daytime, when temperatures were mostly in the 50's and 60's during the winter months, every morning we pushed the cart out of the garage and into full sun as we left for work. We did this for several months until there was no danger of frost or freezing. If we had a greenhouse (we don't) we could have just kept the budded roses in the greenhouse.
Quick Tips for Improved Rose Budding
- Use a good, sharp budding knife (like the Tina #H605, available from Frostproof.com).
- Completely cover the budeye by wrapping it with parafilm budding tape (it is PARAFILM, not adhesive tape) to prevent moisture from entering and rotting the budeye. The parafilm is available from Organic Growers Supply. Note: the budding tape sold at Frostproof is the wrong type as it is NOT parafilm, just plastic, and does not seal well, in my opinion. Regular rolls of plastic used to stake up plants is also the wrong type and will not work well for budding and grafting
- Use well-rooted rootstock, but not overly rootbound.
- Keep the rootstock and budded plant well watered two weeks before and after budding.
- Do not fertilize the budded roses until it has produced new growth of at least 2".
- Do not unwrap the tape from the graft; let it rot and fall off naturally.
- Cut the scion of the desired rose to be budded just a few minutes before budding.
- You can soak the scion in water, but make sure the water is kept clean.
- Keep the work space, scion, and bud knife clean to prevent bacteria from rotting the budeye.
- After cutting off the tops of the rootstock, and after new growth begins to emerge from the bud eye and has grown, pinch off the first several blooms while they are still in tight bud stage. This is to keep stress off of the bud union to help prevent it from breaking off before it has a chance to heal.
- Once the new stems get to about 6 inches tall, we recommend staking the plant to hold it securely.
Reprinted from the May 2010 issue of "Rose Ecstasy," bulletin of the Santa Clarita Valley Rose Society, Kitty Belendez, Editor.
LINKS TO MORE INFO ON ROSE PROPAGATION:
© Copyright Kitty Belendez. All rights reserved.