Improved Techniques for
Rooting Rose Cuttings
Master Rosarian
Santa Clarita, CA
Growing roses can be almost like a science project. Even if you don't care for science, it's always fun to experiment with different ways of growing roses.
Take rose propagating for example. I've experimented with so many different ways of propagating roses by cuttings over the past 18 years that it boggles my mind. Some methods were miserable failures, some were so-so, and others were fairly good. The more I read about how to do it, the more I got confused and frustrated, and the less successful my methods were. It seems that no matter what I did, even with an elaborate automatic misting box, I could not get my success rate over 50%, and sometimes it would fall to 30% and lower depending on the method I used. I asked myself what I was doing wrong.
Last year, I spent some time researching information on an Internet propagating forum, trying to improve my skills for rooting roses from cuttings (sometimes called "cloning"). I read what others around the world have been doing in their methods. Over the summer I tried several methods I had read about, but almost all were a waste of my time. I tried a new rooting medium and a different rooting hormone. I learned that what works for one person, does not necessarily work for another. This is partly due to growing climates and zones. What works for somebody in the southeast region where the weather is very humid, does not work for me in Southern California where the sun can intensely bake at 110 degrees during the summer, and the humidity is extremely low.
So I decided to take all the information that I had accumulated in my head about propagating roses by cuttings, review my past experiences, evaluate each step, and try to come up with something that would help my methods to be more successful. First I began by thinking about all the different ways that I had tried over the years and focus on what had worked and then eliminate what didn't.
There are many factors to take into consideration when propagating roses by cuttings. The factors include time of year, rooting medium, using rooting hormones (or not), slicing the stem at the bottom (or not), misting or putting in a bottle or bag, sunlight or shade, and even the rose variety itself. I would now like to share with you my newest method, which absolutely amazed me by providing a 99% success rate over the past year.
Misting Box
I decided to continue using my misting box for taking cuttings. It's a small box that holds two standard size nursery flats, enough for at least 100 cuttings in 2-inch pots. The Mist-a-Matic mister operates on a solenoid valve that turns on automatically when the paddle becomes dry. So the mister turns on frequently throughout the day. The idea is to keep the cutting stems moist at all times, but the rooting medium (soil) needs to drain well.
Growing Medium
First I took a look at the rooting medium, which I felt was very important to being successful. I had previously experimented with plain potting soil, Oasis blocks (became dried out), 100% vermiculite, sand, peat moss, 100% perlite, a blend of potting soil and perlite, cactus mix, and even a special blend of peat moss and perlite called Sunshine Mix #3 (stayed too wet so the stems rotted). I recalled that the 50/50% blend of SuperSoil and perlite seemed to work the best for my situation, so I decided to return to that rooting medium. This blend is light and airy and allows the cut rose stem to "breathe." The cuttings remain moist while at the same time the soil drains well.
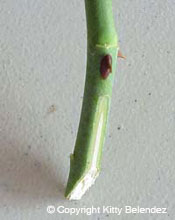
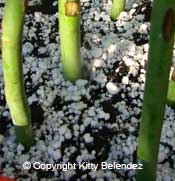
Wounding the Stem
Next, I evaluated whether or not it was necessary to slice the bottom of the stem of each rose cutting. Sometimes referred to as "wounding the stem" there are different ways to do it. Some people just smash the end of the stem with a hammer or blunt tool, others make a thin cut along the stem with a knife, and still others cut the stem at a high angle instead of just a straight cut. The idea is to have as much surface area as possible at the bottom of the stem for new roots to grow. In evaluating this factor, I recalled that my cuttings were the least successful when I had been too lazy to slice the stem.
Now I would take the extra time to slice a small strip off of the cambium layer at the bottom of each stem. For miniatures I take one narrow slice, about 1/8-inch wide and 1/2-inch long, at the bottom of each stem with a sharp X-Acto knife. For larger stems such as hybrid teas and shrubs, I make two slices on opposite sides of each stem.
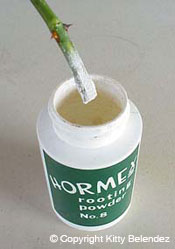
Rooting Hormone
Another important factor is whether or not to use a rooting hormone to aid the cutting in successfully rooting. Most of the time I had been lazy and had not used any hormone. Other times I had used powdered RooTone, or liquid Dip 'n' Grow (too much trouble to mix up a batch). Neither of those hormones seemed very impressive, and not using any hormone was even less successful. So, I researched various brands of rooting hormones on the Internet and decided to buy some Hormex #8 powder (.8% Indole 3 Butyric Acid, IBA) and give it a try. There is also a Hormex #3 available but I went with the stronger #8 as I needed all the help I could get.
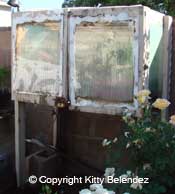
Sunlight
During evaluation of my methods, I discovered that my misting box was not providing enough sunlight to encourage roots to grow on the cuttings. For one thing, my misting box is located up against a block wall facing north so it only got morning sunlight. Another potential problem is that the corrugated plastic sides of my misting box are not clear, but are patterned, and over the past 5 years have yellowed to the point of preventing sufficient sunlight to shine on the cuttings. I don't have space in my garden to move my misting box, but we did change the corrugated siding to a clear plastic that would allow more sunlight to enter the box.
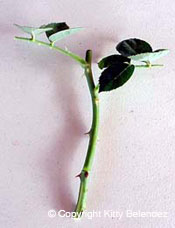
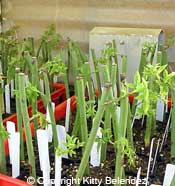
Preparing the Cuttings
To save space in my mister, I decided to use the "community" method of taking rose cuttings for my improved procedure. This is when you place multiple cuttings of the same rose variety all in one pot. For small miniature rose varieties, I put nine cuttings in one 4-inch plastic pot, three rows of three, evenly spaced about one-inch apart. For larger varieties such hybrid teas, I put six stems per pot. This allows sufficient space around each cutting so that they can be separated and repotted after they root.
First I placed 1-inch of lightly moistened 50/50% Supersoil/perlite in the pot and tamped it down hard at the bottom of the pot. This is done to prevent the cutting from touching the bottom of the pot and helps to prevent air pockets that would make it more difficult for the cutting to root.
Then loosely fill the pot all the way to the top, to the point of overflowing, with more of the lightly moistened (not wet) potting soil mixture. Take your prepared cuttings, which are waiting in a cup of water (stems cut about 4 to 6-inches long, flowers removed, all but the top two sets of leaves removed, stem sliced at the bottom) and dip the bottom 1/2-inch of the stem into the Hormex #8 powder. Shake off excess powder, and stick the cutting into the loose potting soil mixture. After all the stems (however many you want to place in your pot) are stuck into the soil, then lightly tamp down the soil around all the cuttings. Insert a plastic label in the pot with the name of the rose variety and the date of the cutting. Then completely water the soil mixture that the cuttings are in and place the pot under the mister (or into a plastic bag or bottle, depending on what method you use).
Timing
Certain times of the year are more beneficial for taking rose cuttings. However, since Southern California weather is relatively mild much of the year, taking cuttings can sometimes be done nearly year round. I have tried all seasons. Freezing weather of course is not good, and 117 degrees in summer can certainly be a challenge for cuttings to root before dehydrating. But the milder weather of late spring and early fall is ideal.
For the first round of this experiment, I took the rose cuttings during the first week of January. I didn't have high expectations for this time of year, but I figured I had nothing to lose. We had an extremely unusual high amount of rain during this year's season, so I often removed the pots full of cuttings out of the mister and just let them sit out in the rain and also to get whatever sunlight they could.
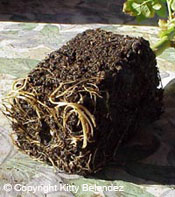
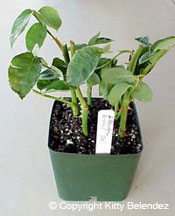
Being wintertime, the rose cuttings took longer than normal to root, but by March (12 weeks) they had become well rooted. I took the cuttings out of the mister and placed the pots under a tree until I had the time to individually repot each cutting.
It is important to note that during cool weather of late fall and early spring (in Southern regions) there is no need to put the rose cuttings under mist. I have successfully placed cuttings in small pots directly out in the sun during mild weather and they have successfully rooted. You do need to water them every day. You could even just stick them directly into the ground. Give it a try!
Some of the rose varieties of which I took cuttings were the old garden roses Sidonie and Marchesa Boccella, the miniatures Bee's Knees, Erin Alonso, My Sunshine and Peggy T, and the polyantha White Pet. Peggy T was the problem child as only one cutting out of nine was successful. Most of the others were 100% successful, while a couple of varieties had 8 of 9 successful. Even with Peggy T's low 10% rate, overall the experiment was a 99% success for all varieties combined.
Phase two of my experiment was started the first week in April, with rose cuttings taken weekly through the end of May. This time cuttings of various shrubs, climbers, floribundas, and miniatures were taken. Varieties such as Hurdy Gurdy, OGR Yolande d'Aragon, the striped floribunda Peppermint Twist, the apricot shrub Leander, and the white polyantha Lullaby are in the test.
By June 1st most of the rose cuttings taken early April were beginning to root and I didn't see one dead stem. I'm pleased to report that my improved method for propagating roses from cuttings is a tremendous success!
TIPS FOR SUCCESSFUL ROOTING OF ROSES
- Select a rose stem that has just finished blooming
- Remove the bloom and all foliage but the top two leaf sets
- Wound the bottom of rose stem
- Dip end of the stem in rooting hormone and shake off excess
- Use 50/50% blend of potting soil and perlite
- Keep the soil moist but not sitting in water
- Label the pot with date started and name of rose
- Mist the rose cuttings daily
- Keep covered in bag, bottle, or misting box
- Provide plenty of filtered sunlight during very hot weather, direct sunlight during moderate climates
LINKS TO MORE INFO ON ROSE PROPAGATION:
© Copyright Kitty Belendez. All rights reserved.
This article is an ARS Award of Merit Winner, originally published in "Rose Ecstasy," bulletin of Santa Clarita Valley Rose Society, Kitty Belendez, Editor.
Photos © Copyright by Kitty Belendez
For questions about Santa Clarita Valley Rose Society, contact: Rose Society