How to Grow Roses from Seed
Rose Hybridizing is Fun and Easy
By Kitty Belendez
Master Rosarian
All photos are enlarged from actual size.
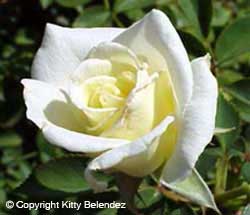
Growing roses from seed is certainly not the fastest method of propagating roses, but I can assure you it really is the most rewarding. However, rose hybridizing is surely a lesson in patience, since your success rate can be very small, and it may take several years to reap your rewards. Imagine opening up presents on your birthday or at Christmastime when you were a kid. Well, that's how it feels to see those little rose seedlings open up for the very first time. You never know what you will find inside.
There will be disappointments along the way, when many rose seeds fail to germinate, or perhaps they do germinate, only to die several weeks later from damp-off disease. Sometimes a rose seedling will turn out to be as ugly as sin, or very sickly, and you will reluctantly have to throw it away. Other times they will be just ho-hum, or look too much like its parent, and therefore have no value. But, just when you don't expect it, you might discover that one of your rose seedlings turns out to be very special.
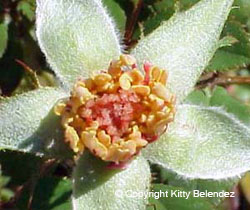
Rose Anatomy 101
Roses are bi-sexual because they have both the male (stamens) and female (ovary) organs. So, if you leave them alone, some will pollenate themselves and set hips full of seeds. But, if you want to cross two different roses, you must first remove the pollen from both roses, and then cross-pollenate them.
The Easy Way to Grow Rose Seeds
The easiest way to begin experimenting with rose hybridizing, especially for the beginner, is to simply let some of your roses self-pollinate themselves, so they will "go to seed" and set hips. I have found that Playboy, Hurdy Gurdy, Peggy T and Fairhope are some of the easiest roses to set hips, and there are many others. Let the rose hips stay on the rose bushes at least four months before harvesting.
When To Hybridize Roses
In Southern California, the second bloom cycle is the best time to start hybridizing. So, if you make your crosses around the first two weeks in June, the hips will be ready for harvesting in October or November. The hips must develop on the bush for at least 4 months in order to reach maturity.
The Tools You Will Need to Grow Rose Seeds
- Black or Clear Plastic Film Canisters
- Labels (both paper & plastic)
- Black Permanent Marker or wax pencil
Collecting Rose Pollen
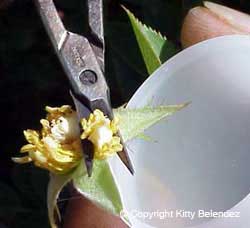
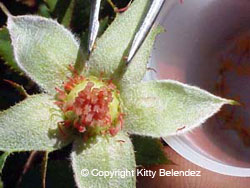
Select two roses that you want to cross-pollenate. The blooms should not be too tight, perhaps about one-half to 3/4 open. Carefully peel off all the petals. The rose stamens inside should look golden yellow and fresh. With sterile tweezers or cuticle scissors, carefully remove all the stamens at the base of the rose hip, so you do not damage the pollen sacs (anthers). Place the rose stamens into separate, clean film canisters, and place the canisters in a dry place, but not in direct sunlight.
Label the canisters with the name of the pollen parent. Do not put a lid on the canister so they will dry out and not get moldy. After a few hours (on some rose varieties), or the next day (on other varieties), the pollen sacs will burst open, thereby releasing the pollen. Sometimes you will need to shake the canister so that the rose pollen will release from the pollen sacs. The black film canisters make it easy for you to see the pollen, which looks like a fine yellow powder. The pollen will stay fresh for about two weeks.
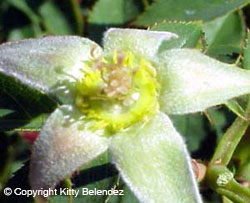
At the same time, the stigma on the rose flower head has become sticky, which means it is ready to accept the pollen.
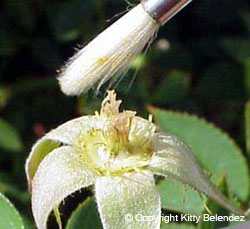
Cross-Pollenating Roses
Take a sterile Q-Tip or small sable artist's brush, and dip it into the rose pollen you want to use. Then dab the pollen-coated Q-Tip or brush onto the stigma of the rose you have selected as the seed (female) parent. You could also simply use your finger to apply the pollen to the rose. Repeat this procedure after four hours, and then again after another four hours. Label the rose hip with the name of the seed parent as well as the pollen parent, i.e. Fairhope x Miss Flippins. The name that appears first is always the seed parent (the mother), and the second name is the pollen parent (the father).
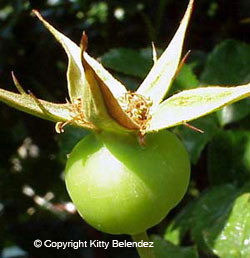
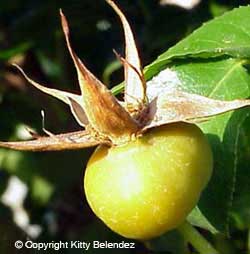
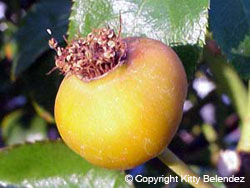
Harvesting the Rose Hips
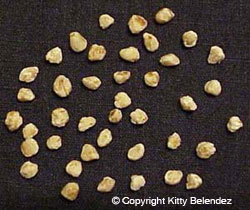
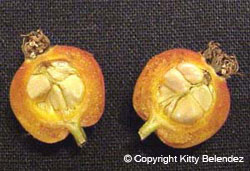
When the rose hips are ripe, after about four months, cut them off the bush. Some rose hips will turn yellow, orange, or red, but others stay green even when they are ripe. You can open the hips as soon as harvested or you can store the unopened hips in the refrigerator for several weeks before opening. Then slice the rose hips in half, and open them with a knife. A butter knife will do just fine. Now, dig the rose seeds out of the rose hip with the knife, and throw away the pulp and outer shell.
Soak the Rose seeds
As soon as the rose seeds have been removed from the rose hips, rinse the seeds in a solution of purified water (any bottled water will do) with 5% bleach. This would be about two teaspoons of bleach per cup of water. Rinse the rose seeds with plain bottled water in a strainer, then soak the seeds in straight 3% peroxide for 24 hours. CAUTION: Do not mix bleach with peroxide because there could be a chemical reaction.
The Water Float Test
Some people don't bother to take the time to do this, but others do. While the rose seeds are soaking, you will see that some sink to the bottom and some float on the top. The seeds that float are sometimes not viable, so you might want to throw them away. The rose seeds that sink are said to be the good ones, and are the ones to plant. There are pros and cons to this theory, and many rose hybridizers simply plant all the rose seeds that are harvested.
Clean the Rose Seeds
A gentle way to clean the rose seeds is to use a Cuisinart or other brand of blender with a dough blending attachment, which is made of plastic and does not have sharp blades. You can blend the rose seeds using this gentle dough attachment for several minutes without any damage to the seeds. Do not use a blender with sharp metal blades as damage to the rose seeds may occur.
After the rose seeds have soaked overnight, rinse them in a strainer and place them into the blender with at least a cup of plain purified water (making sure all seeds are covered), and turn it on for a few minutes. It usually doesn't chop up the seeds, but rather, it will clean off the pulp remaining from the rose hip, which would otherwise mold if left on the rose seed. You may see a few seeds chopped up, but those usually aren't viable anyway. Flush the rose seeds again through a strainer using fresh purified water.
An alternate way to clean the rose seeds is to spread the seeds out on a clean cloth towel and scrub them with a brush to remove all pulp around each seed. However, this can be a lot of work, and the blender method is much easier and quicker.
To Stratify or Not to Stratify
Some rose hybridizers chill their rose seeds in the refrigerator for about six to ten weeks before planting, to encourage the seeds to germinate better. This is called stratification. If you keep the rose seeds in the refrigerator too long, they might begin sprouting before you plant them.
One way to stratify the rose seeds is to place the cleaned seeds on a paper towel (a heavyweight brand such as Bounty). Then moisten the paper towel with a solution of half & half purified water and peroxide (to help prevent mold). Fold the paper towel closed, encasing all the rose seeds in the moistened paper towel. Then place the towel full of seeds into a plastic zippered bag. Mark the seed variety and date on the outside of the plastic bag with a permanent marker, and then place the bag into the refrigerator set at about 34-38 degrees. Never freeze the seeds, and do not let them dry out. The moistened paper towel should remain moist in the closed plastic bag for many weeks.
Another way to stratify the rose seeds is to plant the cleaned seeds directly into a tray of potting soil (see below) and refrigerate the entire tray or pot of seeds. If refrigerating the tray for several weeks, it's best to enclose the tray in plastic to keep the soil moist.
When and How To Plant Rose Seeds
The rose seeds can be planted right away if you have harvested them as late as November, December or January (in Southern California) or early spring after danger of frosts in your area. Place the rose seeds about one-half inch deep in a very light mixture of 50% sterile potting soil and 50% vermiculite. Some rose hybridizers use Sunshine Mix #4. You can use small pots or shallow trays to plant your seeds, whatever works for the space you have, as long as they have good drainage. Nursery flats work well for this. Lightly dust the rose seeds with RooTone or Captan before covering with soil. And then dust the top of the soil again, which will hopefully help to prevent damp-off (a disease which kills young rose seedlings). Amateur rose hybridizers concerned with toxic chemicals may want to periodically spray the seed tray with diluted peroxide and water instead of the more toxic Captan.
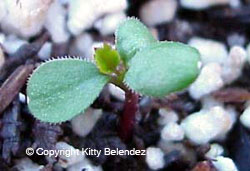
Water the planted rose seeds well and place them outside in direct sunlight (no need for Grow Lights). If there is still danger of frost, then you will need to place the seed trays in a protected location such as under a tree or patio. You will need to keep the rose seed trays watered and don't let them dry out. After about six weeks, or when the weather starts to warm up, the little rose seedlings will start to sprout. They will continue to sprout as long as the weather is cool, but will stop sprouting when it gets too hot.
Label the Rose Seeds
You should label the rose seeds you have planted, so you will know later what their parents were. However, I have heard stories about how some rose hybridizers just don't bother to do this. But then, commercial growers always list the parents of all their new rose introductions. Personally, I like to know the parents of a rose.
Transplanting the Rose Seedlings
When the rose seedlings are a few inches tall, you can transplant them carefully into their own individual pots if you wish. Or you can evaluate them in the trays to decide which ones you want to keep, and then transplant them when they have outgrown the pot or tray.
It takes at least three years for a new rose seedling to reach maturity by developing into a big bush. And, it can take up to five years to completely evaluate them.
MORE ARTICLES ON PROPAGATING ROSES:
© Copyright Kitty Belendez. All rights reserved.
This article is an ARS Award of Merit Winner, originally published in "Rose Ecstasy," bulletin of Santa Clarita Valley Rose Society, Kitty Belendez, Editor.
Photos © Copyright by Kitty Belendez